

From diapers to summer camps, many Linqia programs feature children as a central part of the story. Including clear, well composed photos of children in these stories is key to engaging an audience and drawing them into the content. But getting kids to sit still or pose for a picture can be challenging, even on when they are on their best behavior.
Below are some tips and tricks on photographing children from three Linqia influencers. They have learned through experience the best ways to get those wonderful shots that you will cherish for years to come:
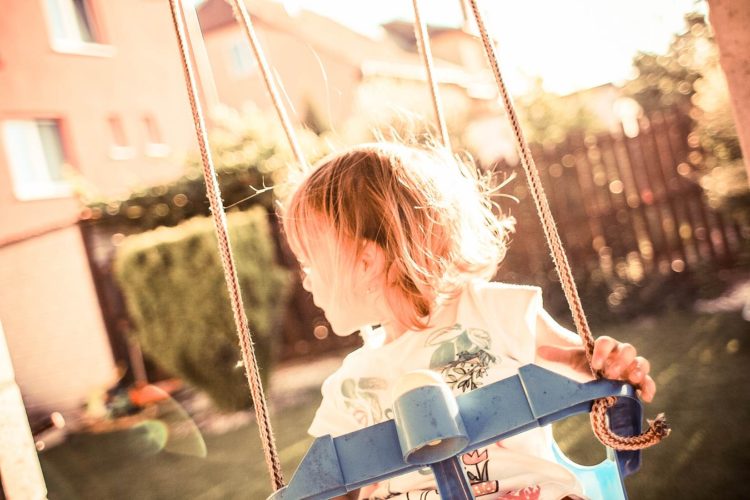
Ramblings from Utopia
Many have asked how I get my four kids so look so happy or smile in photos, so I thought I share a few tips I’ve learned over the years.
Were not all smiley happy people holding hands.
First I never bribe my kids, ever! I want them to look natural and not have a fake awkward smile just to get a piece of candy. Also, I never promise anything in return, other than the sooner they smile the faster we’ll be done. Usually the reward of being free from Mommy’s picture taking is enough. So, over the years they’ve become quite good at smiling. Our annual holiday photo shoot is finished in 20 minutes or less and I’ll have a ton of images to choose from.
One thing I wish parents wouldn’t promise before a photo shoot is candy or treats, after a few clicks of the camera the kids are looking for that reward and we have a long way to go before the session is over. I’ve also had parents teach kids to say cheese to the camera, ugh! Have you ever looked in the mirror and said cheese? I looks nothing like a nice natural smile.
Kids need to be comfortable around a camera, sometimes I’ll let them hold my camera or look at themselves on the screen, the camera no longer becomes an unfamiliar object between me and them and I’ve seen kids do a complete 180 and we finish with an amazing shoot.
I’ve always let my kids play with a real camera, an old point and shoot is a great way for them to play and learn about photography.
It’s not always easy and not everyday is a good day for every kid. As a photographer, I have to be flexible. You can’t force a child to sit still and smile, but making them feel like they are a part of the decision-making helps… or maybe it’s that person behind me jumping up and down and standing on their head that works the best.
Housewife Eclectic

I spend a good portion of my time photographing children. It is actually one of my favorite things about being a photographer. I love working with children. They have so much personality and they bring life to photographs. I think sometimes children get the reputation of being the most difficult to photograph (totally not true, have you ever tried to photograph a teenage boy who really doesn’t want his picture taken?). This can be true so here are so ideas to get the most out of your next session with a child.
- A couple of people at a photo shoot is plenty. The more people you get that are telling a child what to do, the more confused they get. Keep it simple. One or two people to help with smiles is usually plenty.
- Be patient. You need to work on the child’s schedule, not yours. A lot of kids take some time to warm up to a new person. Don’t be afraid to play for a little while to get the child into a happy mood.
- Work on the child’ schedule! If they take naps at noon, don’t try to photograph at noon. Photograph when they are the happiest.
- Try to capture who they are. Sometimes a pictures of a child, sitting and smiling for the camera work. Most of the time,they don’t. Let the child be themselves. Let them wander and explore. Who knows you might find your best shots just by following them around.
- Set up your shot. Using sentences likes “Give your brother a kiss.” “Can you give the baby a hug?” “Let’s jump as high as we can.” will help set up moments that are perfect to capture with your camera.
- Positive reinforcement works, negative does not. If you want your kid to smile, it is better to offer them ice cream if they will smile, rather than telling them you are going to take away a certain toy unless they smile. The child is so worried about being grounded or losing their toy that they can’t give those really happy smiles you want. Trust me on this one. When I worked at a portrait studio, this was the number one reason that sessions ended with tears.
- Don’t get angry with your kids! When mom gets mad, the kids feel it and often times the session is over after that. Even if we can calm them down after this they usually have red eyes from crying. This one seems like a no brainer but it happened at the portrait studio a lot. I don’t see it very much now, but keep it in mind if you are taking your kids to a portrait studio. They are stressful places, don’t let it get to you.
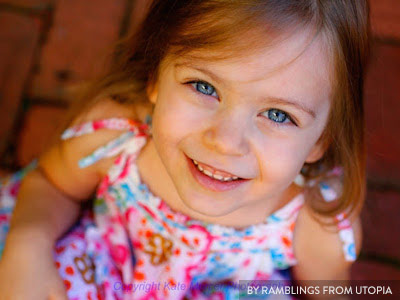
- If possible, always, always use the eyes as your focal point.
- Let the child bring their own toys. My props are cute, but they don’t mean anything to that particular child. Any picture is more special with her favorite doll in it.
- Play with your subject. I don’t think I can even count how many games of Peek-A-Boo I have played while photographing. Games work because they are fun and they naturally make the kids want to smile.
- Kids have a short attention span. Really short. Be prepared with props, outfits and whatever else you want to do. Don’t be unrealistic. I did 10 or so outfits for my little girl’s 18-month pictures but I had to shoot over 5 days because she only had the attention span for about 2 a day.
- Go to their level. I spend most of the time I shooting a small child either squatting or on my knees. Being at their height allows you to interact with them better and it lets you see the world the way they do.
- The best photo from a shoot isn’t always one where they are looking at the camera. Capture all sorts of images. The ones you end up liking might surprise you.
- Some good poses for children:
- laying them on their stomachs with their feet in the air
- sitting with their arms wrapped around their knees
- leaning against a wall or tree
- hugging a tree or light post
- laying on their back with their hands behind their head
- Following them around and letting them be themselves!
It’s Always Autumn
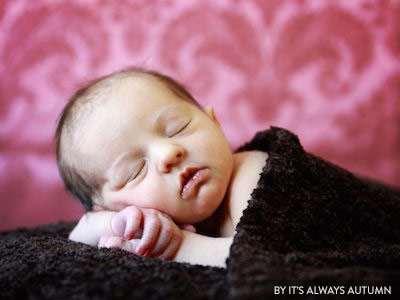
Most people recommend holding a newborn photo shoot within the first ten days of your baby’s life. When babies are this young they are generally very sleepy, which is a good thing for photos. Why? Because a sleeping baby isn’t crying, doesn’t have crossed eyes, doesn’t have a huge pacifier in her mouth, and isn’t flailing her arms about uncontrollably (all of which happen quite regularly when she’s awake). Sleeping newborns look sweet and peaceful, while awake newborns can look a little awkward. If you start your photoshoot while the baby is asleep you can get lots of sweet sleepy pictures, and then a few more when she wakes up.
Another reason to hold a newborn photo shoot soon after birth is because babies change so quickly the first few months, and you don’t want to miss the chance to photograph that uber tiny newborn look. Does this mean you can’t get good pictures when your baby is three weeks old instead of seven days? Of course not. But earlier can be simpler, which is always a good thing.
Plan to set up everything you need for your photoshoot early in the day. Then keep your baby active and awake for a while, then feed her, then get ready to take pictures when she starts to fall asleep.
Plan on spending at least an hour to get some good shots. I generally spend two hours when I photograph a newborn (some pros spend twice that much time). If you’re taking pictures of your own baby, you could also plan to spend just half an hour but try once a day for the first week. Figure out what will work best for your schedule, but realize this won’t be a quick process. Also, the photoshoot will be much easier if you have someone to help you, so rope your husband/mom/friend into being your assistant.
I think newborns look best photographed naked, or in just a diaper, or in a plain white onesie. Most baby clothes are way too big for newborns and just don’t photograph very well. Keeping the clothes extremely simple keeps the focus on the baby. However, naked babies are cold babies, so keep a space heater going right next to your baby the whole time you are photographing him. You’ll end up covered in sweat, but your baby will stay comfortable.
Lighting
For good portraits you must turn off your flash. Your camera’s pop-up flash does more harm than good in most photography situations, so make sure you aren’t using it when you try to photograph your newborn. Instead, find a good source of natural light, like a large window or glass door, and set up close to it. If you have enough light coming in you won’t need either your flash or your overhead lights (which are also not a good plan when taking portraits). If it’s warm enough you can even set up in your garage with the door up to allow lots of light in. Start paying attention to the light in the room in yourself with the largest window – notice when the room is bright, but you can’t see the shadow of the window on the floor in front of it (see this post for more explanation of this). That’s the time of day when you want to plan your newborn photo shoot.
Camera and equipment
You can get good photos of your baby using any camera, even if you shoot on auto. I find that most photos taken on auto tend to be underexposed, so if you are going to shoot on auto, read my post on brightening photos in post processing.
If you have a dSLR and any lenses with wide aperture capabilities (like a 28-70 2.8 or even a 50 1.8) I’d recommend using one of those lenses and keeping your aperture open fairly wide, around 2.8. That will help to blur the background and make the photographs look a little more professional. If not, don’t sweat it – turning off your flash will force your camera to use the widest aperture it’s got (using the portrait setting will also help here). Your camera may have a harder time keeping the shutter speed high if it’s not very bright in your house, so consider using a tripod if you have one. Better equipment sometimes makes for better photos, but knowing how to use what you have is really more important. If you have a few months before your baby is born, spend a little time getting to know your camera. If you don’t have time to practice, following my tips will still help you improve your photos.
The Set Up
This is what you will need:
1. Large window. A window that goes all the way to the floor would be even better, but I don’t have one, so I make do with what I do have.
2. Backdrop board. I have a couple DIY backdrop boards that I made for about $10 each (full instructions in this post). I stand one up against the backs of two of my kitchen chairs. The backdrop boards can be used alone for a solid colored background, or can be used to drape blankets from for more background options. The background should be angled so it faces the right or left side of the window, not the middle of it, as you can see in the photo above. This will allow the baby’s head to be a little closer to the window than her feet, allowing the light to hit her forehead first, causing gentle shadows just under her nose and chin. If you don’t have a backdrop board, stand two kitchen chairs backwards here anyway so you can drape a blanket from them.
3. Couch cushions. You want the baby up off the ground so you can photograph her from all angles, not just from above. (Occasionally I do put the baby all the way down on the ground to photograph her from directly above – I’ll discuss that tomorrow.)
4. Pillow, boppie, or beanbag. It’s nice to have something a little bit soft you can lay the baby on and then move around to help position him. A small bean bag would be perfect, but I don’t have one, so I use a pillow or boppie.
5. Protective plastic. This is only necessary if you plan to photograph the baby without a diaper on. He will go to the bathroom sometime during the photo shoot (it always happens) so protect your pillow and cushions.


